Most people think packaging is just a box or a bottle. But if you’ve ever opened a product that felt like it was made with care-where the unboxing felt like a small celebration-you’ve felt the power of good packaging design. It’s not just about looking pretty. It’s about function, feel, and future. A packaging design course that skips dielines, mockups, and sustainability is like teaching photography without explaining focus or exposure. You might take pictures, but you won’t know why some work and others don’t.
What Dielines Actually Are (And Why You Can’t Skip Them)
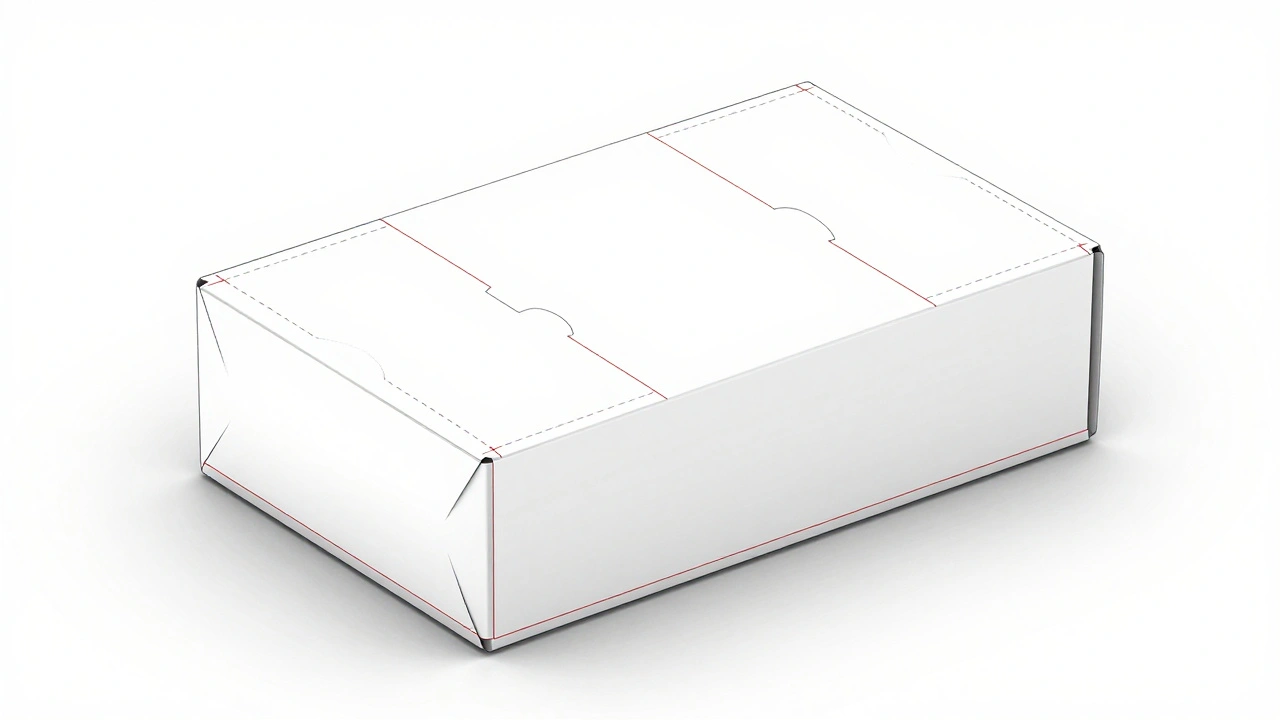
Dielines are the blueprint of packaging. Think of them like the flat pattern you cut out before folding a paper box. They show exactly where folds, cuts, and glue tabs go. Without a correct dieline, your beautiful design ends up crooked, misaligned, or worse-unprintable. Printers won’t even start unless the dieline matches their machine specs.
Dielines aren’t drawn in Photoshop. They’re built in vector software like Adobe Illustrator or CorelDRAW. Each line has meaning: solid lines mean cuts, dashed lines mean folds, and red lines often mark bleed areas. A common mistake beginners make is designing the graphic first, then slapping on a dieline. That’s backwards. You start with the dieline. Then you design around it.
Real-world example: A client in Auckland wanted custom cereal boxes with a die-cut window. The designer used a generic dieline from the internet. When it went to print, the window was 3mm too wide. The entire batch-20,000 boxes-had to be scrapped. That’s a $15,000 mistake. Dielines aren’t optional. They’re the foundation.
Mockups: From Flat Design to Real-World Feel
Designing on a screen is one thing. Seeing how that design looks on an actual box, bottle, or tube is another. That’s where mockups come in. A mockup turns your flat artwork into a 3D representation that shows texture, lighting, and how the design wraps around curves.
There are two kinds: digital and physical. Digital mockups use tools like Adobe Dimension, Blender, or even free online generators like Placeit. They’re fast and cheap. But they lie. A glossy finish on screen doesn’t tell you how it feels in hand. A matte label might look dull in a render, but in real life, it feels premium.
Physical mockups-also called prototypes-are made with the same materials the final product will use. A cardboard tube? Use the exact paper stock. A plastic bottle? Print on a sample from the manufacturer. You’d be surprised how many brands skip this step. They assume their design looks good on screen. Then they launch, and customers say, ‘It looks nothing like the photo.’
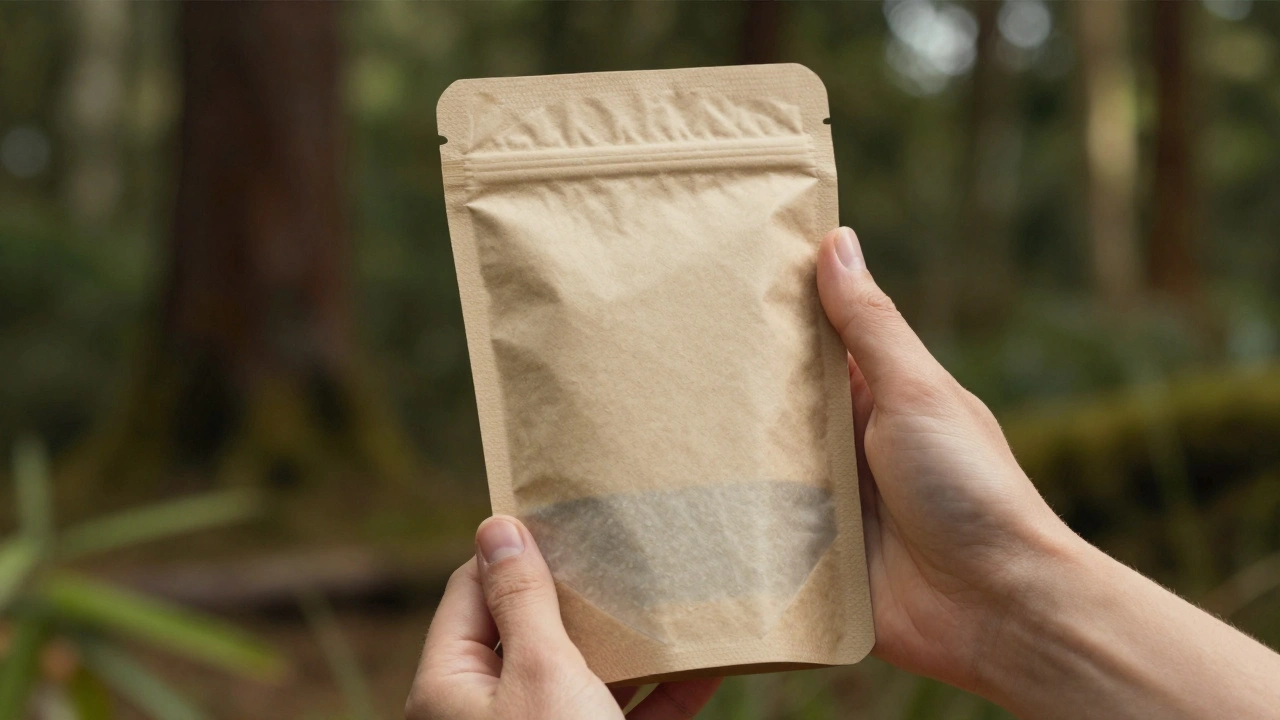
One brand in Wellington spent $800 on 10 physical mockups before launching their organic tea line. They discovered the label curled at the edges when exposed to steam. They fixed it before production. That $800 saved them $40,000 in returns.
Sustainability Isn’t a Trend-It’s a Requirement
In 2025, sustainability isn’t a buzzword. It’s a dealbreaker. 73% of New Zealand consumers say they’ll pay more for packaging that’s recyclable or compostable. The government’s Single-Use Plastics Ban kicked in last year. That means no more plastic windows on cardboard boxes, no plastic wrap on multipacks, no non-recyclable laminates.
So what does sustainable packaging actually look like?
- Recycled paperboard (minimum 80% post-consumer waste)
- Water-based inks instead of petroleum-based
- Minimalist design-less ink, less material
- Monomaterials-like all-paper or all-PP plastic-so it’s easy to recycle
- Compostable labels made from plant-based films
One designer in Christchurch switched from a glossy plastic pouch to a compostable stand-up pouch made from cornstarch. The client thought it would cost 40% more. It cost 12% less because the new material was lighter, reducing shipping costs. Plus, the brand’s social media engagement jumped 60% after they showed the compostable packaging in their ads.
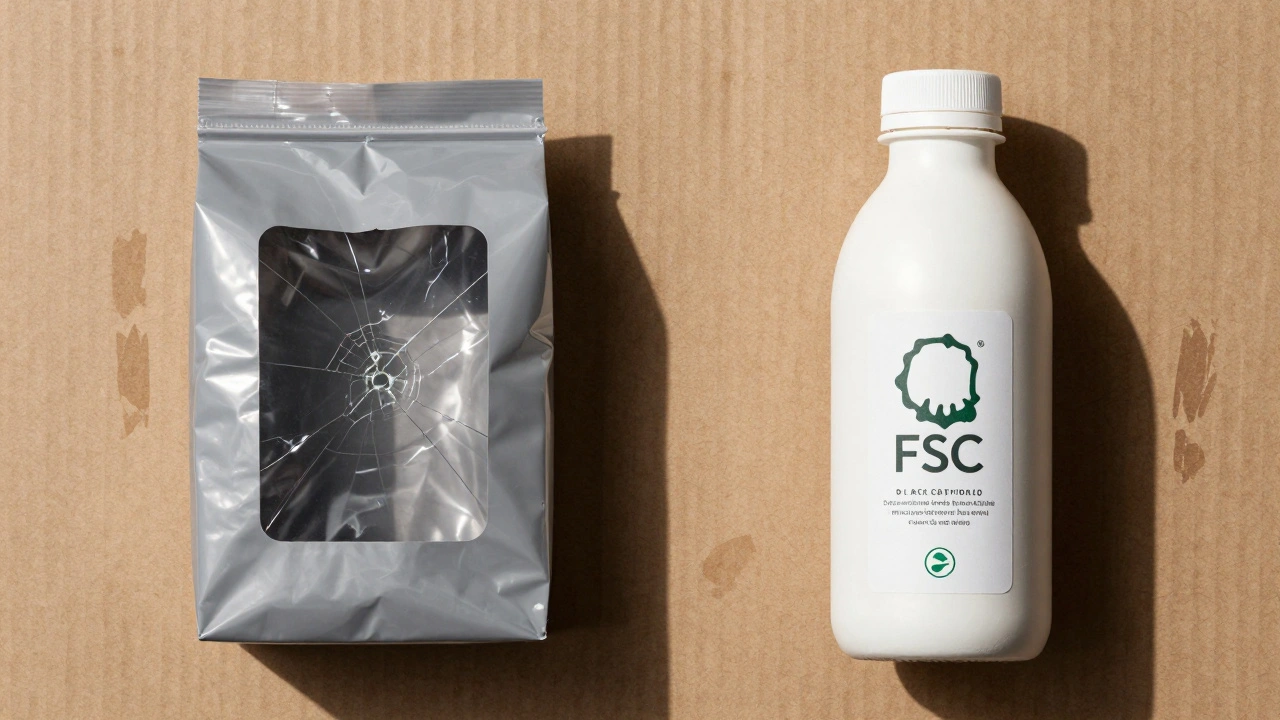
But here’s the trap: greenwashing. Saying ‘eco-friendly’ without proof is illegal under New Zealand’s Fair Trading Act. You need certifications. Look for FSC (Forest Stewardship Council) for paper, TUV OK Compost for bioplastics, or How2Recycle labels. A packaging design course that doesn’t teach you how to verify these claims is teaching you half a job.
How These Three Elements Work Together
Dielines, mockups, and sustainability aren’t separate lessons. They’re a chain. A dieline determines how much material you use. A bad dieline wastes paper. A mockup shows if your sustainable material looks cheap or premium. And if the mockup reveals that your compostable film wrinkles under heat, you go back to the dieline and redesign the shape.
Take a coffee bag. If you use a dieline that requires 5 layers of plastic, you’ve failed sustainability before you even printed. If you use a mockup and the bag looks flat and lifeless, customers won’t trust the coffee inside. If you fix the shape to use less material but the mockup shows the logo gets distorted on the curve-you’ve got a problem.
The best packaging designers don’t just make things look nice. They solve problems. They balance cost, function, and planet. They test. They fail. They fix. That’s what this course teaches.
What You’ll Actually Build in This Course
You won’t just watch videos. You’ll build real projects:
- Create a dieline for a 250g snack box using industry-standard bleed and fold specs
- Design a full-color label that wraps around a 300ml glass jar, accounting for curvature and edge overlap
- Build a digital mockup in Adobe Dimension with realistic lighting and material textures
- Redesign a common plastic bottle into a mono-material, recyclable version using FSC-certified paper
- Present your final design with a printed prototype and a sustainability compliance checklist
Each project is based on real briefs from local New Zealand brands. You’ll work with actual printers, material suppliers, and packaging engineers. No hypotheticals. No made-up scenarios. You’ll graduate with a portfolio that shows you can deliver.
Common Mistakes Students Make (And How to Avoid Them)
- Using RGB colors → Print uses CMYK. Your bright pink online turns muddy brown. Always set your file to CMYK from day one.
- Ignoring trim and bleed → If your design ends at the edge, you’ll get white borders. Always extend background colors 3mm beyond the cut line.
- Choosing ‘biodegradable’ plastic → Most need industrial composting. In NZ, those facilities are rare. Stick to home-compostable or recyclable.
- Skipping the mockup → You’ll think your design looks great until you see it on a curved surface. Always mock up.
- Not talking to the printer → Printers have limits. Some can’t print fine text under 6pt. Others won’t print metallic inks on recycled paper. Ask early.
Where This Skill Takes You
Brands need packaging designers more than ever. From boutique wineries to DTC skincare brands, everyone wants packaging that stands out and does right by the planet. In New Zealand, the packaging design market grew 22% last year. Freelancers charge $60-$120/hour. Agencies pay $70K-$110K for senior roles.
But the real value isn’t the paycheck. It’s the impact. You’ll design packaging that reduces waste. You’ll help small businesses compete with giants. You’ll make products that feel thoughtful, not throwaway.
This isn’t just a design course. It’s a launchpad for responsible creativity.
Do I need to know how to draw to take this course?
No. This course focuses on digital design tools, technical specs, and material knowledge-not hand-drawing. You’ll use Illustrator and other software to create clean, precise designs. If you can use a computer, you can do this.
Can I take this course if I’m not in New Zealand?
Yes. The course is fully online and includes global printing standards. While examples use New Zealand regulations, the core principles-dielines, mockups, material selection-are the same worldwide. You’ll learn how to adapt to your country’s recycling rules and printer specs.
What software do I need?
You’ll need Adobe Illustrator for dielines and layouts. Adobe Dimension or Blender for mockups. Photoshop is helpful but not required. All software offers free trials. You don’t need to buy anything upfront.
How long does the course take?
Most students complete it in 8-10 weeks, spending 5-7 hours per week. It’s self-paced, so you can go faster or slower. You’ll have lifetime access to materials and updates.
Will I get a certificate?
Yes. You’ll receive a digital certificate showing you’ve mastered dielines, mockups, and sustainable packaging design. It includes a unique verification code employers can check.
Comments
Rubina Jadhav
I never realized how much thought goes into a cereal box until now. Simple stuff, but so important.
Thanks for breaking it down.
sumraa hussain
DIELINES??? MOCKUPS??? SUSTAINABILITY??? BRO. THIS ISN’T A COURSE. THIS IS A WHOLE LIFESTYLE.
One wrong line and your whole brand looks like a Walmart knockoff. One wrong ink and the planet cries. One missed mockup and your customer throws your product in the trash screaming ‘FAKE!’
I’ve seen it. I’ve lived it. I’ve wept over misaligned bleed lines at 3am.
THIS ISN’T DESIGN. THIS IS SACRED.
Raji viji
Lmao you people act like dielines are some mystical art form. I’ve seen interns in Mumbai slap together dielines in Inkscape and ship 50k units. No one cares if it’s ‘perfect’-they care if it fits the shelf and doesn’t leak.
And ‘sustainability’? Please. Most of that ‘compostable’ crap just turns into microplastics in landfills. FSC? Yeah right. Half those certs are bought with chai and bribes.
Stop romanticizing packaging. It’s a box. Print it. Ship it. Move on.
Also, Adobe Dimension? Use Canva. Same result. 10x cheaper.
Rajashree Iyer
Every fold in a dieline is a silent prayer. Every bleed is a promise to the earth. Every mockup is a mirror reflecting the soul of the brand.
You think you’re designing a box? No. You’re designing the moment a child opens their first birthday present. The gasp. The wonder. The quiet awe.
That’s why we can’t skip the details. Because the universe whispers through the curve of a label, and if you ignore it… you’re not just bad at design.
You’re spiritually lost.
Parth Haz
This is one of the most well-structured overviews of modern packaging design I’ve read. The emphasis on practical application-dielines, mockups, sustainability-is exactly what’s missing from most design curricula.
For anyone serious about entering this field, this course seems like a necessary investment. The real-world examples from New Zealand add tremendous credibility.
Thank you for sharing such a thoughtful, comprehensive perspective.
Vishal Bharadwaj
73% of NZ consumers? Where’s your source? I’ve read the stats-its more like 42% and only in urban areas. And ‘compostable’ labels? Most composting facilities in NZ don’t even take them. You’re feeding people misinformation.
Also, ‘monomaterials’? Good luck finding a printer that can handle all-paper bottles without a $20k machine.
This course sounds like a marketing gimmick. You’re selling fantasy, not skills.
Also, typo in ‘dieline’ on page 3. Fix it.
anoushka singh
Okay but like… why is everyone so serious? I just want to make cute boxes for my homemade jam. Do I really need Adobe Dimension? Can’t I just use PowerPoint?
Also, I printed my label on my home printer and it looked fine. Why do I need a $800 mockup? Am I doing this wrong??
Also, can I still use glitter? I love glitter.
Nalini Venugopal
There’s a comma missing after ‘printers’ in the third paragraph. Also, ‘mockups’ is plural but you wrote ‘mockup’ singular later in the same sentence. And ‘FSC-certified paper’ should be hyphenated consistently. Grammar matters, especially when you’re teaching professionals.
Other than that, solid content. Just polish the edges.
Pramod Usdadiya
As someone from India who works with small packaging units, I can say this: dielines are life or death. One wrong fold and your whole batch is scrap.
We don’t have fancy Adobe tools. We use free software, hand-drawn templates, and a lot of prayer.
This course would’ve saved me six months and three failed launches.
Thanks for writing this. Even if you’re in NZ, your words travel far.
Aditya Singh Bisht
Guys. Stop overthinking. You don’t need to be a genius to design packaging. You just need to care.
Start small. Test cheap. Learn from mistakes. That cereal box that cost $15k? That’s not a tragedy-it’s a lesson.
And sustainability? It’s not about being perfect. It’s about being better than yesterday.
If you’re reading this and thinking ‘I’m not ready’-you already are.
Go build something. Then build it better. Then build it again.
That’s the real course.
And yeah… glitter’s fine. Just use biodegradable glitter. I found a supplier in Jaipur. DM me.